Ok, well in Part.1 you saw how she flew and fly well she does, but getting to that stage wasn’t quite the picnic I had hoped for.
Fly-Fly BAe Hawk – Pt.2
by
–
Being a slow and methodical builder, I put the kettle on, got out the sticky buns, and turned firstly to the build manual. This is the now all too familiar pictorial offering of just a few pages, but I have to say this is one of the poorest I have ever come across.
Cyril Carr is an obvious gentleman when he described it recently in the magazine as inadequate. Many of the drawings are so small that it is almost impossible to ascertain just what they are trying to illustrate, and several items of the build are either plain wrong, or completely omitted altogether. I could go on…and on but suffice to say that you will need a lot of patience, experience, and some head scratching in order to fathom it out, and frankly mine went in the bin pretty early on in the build.
Upon closer inspection of the airframe it was apparent that quite a bit of work was needed to clean up the air intake areas. A simple rolled thin acetate sheet was supplied as an efflux tube, but the intake was simply shaped from the moulded foam of the fuselage itself. Static tests of EDF units have proved to me the benefit of nice, clean, turbulence-free airflow into the fan, and there were lots of mould release pips all along the intake duct which would have to go. Worse still was the 1inch diameter thick stub of solid foam standing well proud of the surface on each fuselage side right in the intake path a sharp scalpel was used to remove them. Also, fly-fly had for some strange reason, elected to cast their company logo and name quite deeply into the foam right next to these stubs. Daft.
After sanding everything down, I applied ultra-light filler to the areas and also to the many other scratches and dents. This was followed by careful sanding with 800 and then 1000 grade emery paper until I was happy. Be very careful here as the edge of a small piece of emery paper will easily tear further scratches into the foam. I had decided fairly early on that due to the very easily scuffed surface, a lightweight covering was going to be needed, along with obviously a paint job. more on this later. This alone means that what should be a quick to build ready finished airframe will simply just not be. The kit is marketed as ‘Almost Ready To Fly’ but this is a serious breach of trades description, and as Cyril has again mentioned in the magazine review article, a lot of work and alteration from original is required if you are to end up with a reasonable looking, flying, and ‘ROG’ capable model.
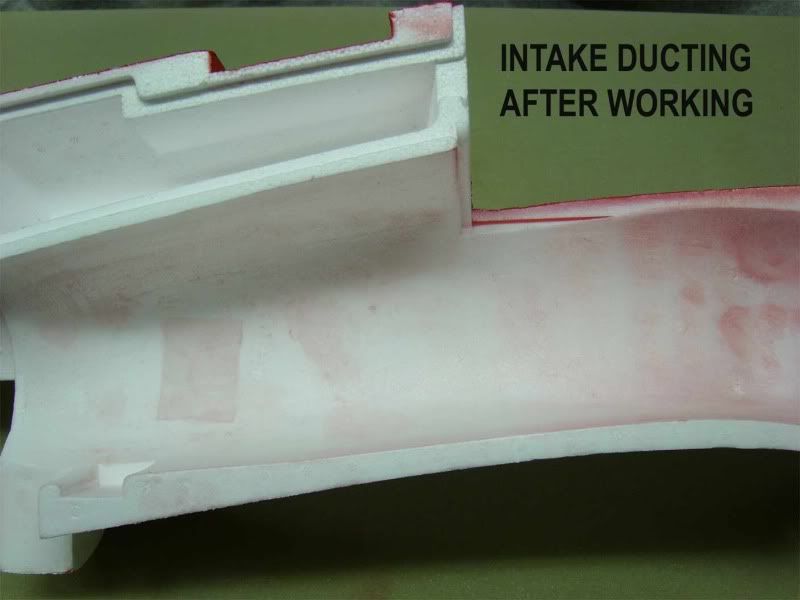
When satisfied with the final finish of the ductwork, I tried a few more ‘dry-fits’ and figured that the next step was to join the front and rear sections of each fuselage half together. In the absence of any instructions on this step whatsoever, I lined up the sections of each side using the moulded in keyways, and elected to use the supplied glue, (which resembled the familiar UHU Por contact adhesive) on each mating section, after allowing a short cure time first. At this stage you again get to appreciate just how big this thing is!
POWERTRAIN AND RADIO
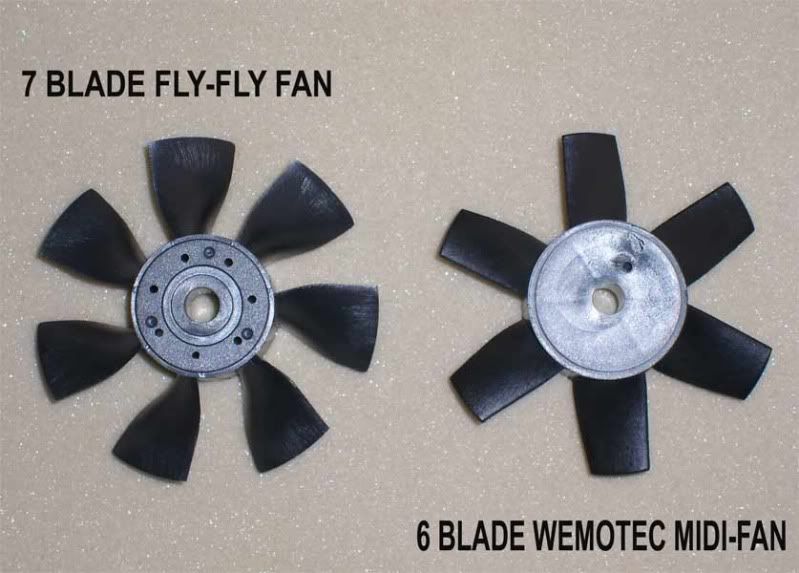
I did a lot of testing early on with powertrains and had decided to go the 6s Li-Po route, and found from experimentation on my thrust stand that the supplied 7-blade fan was very inefficient and also pulled a very high current from a 6s Li-Po. Exchanging this for a Wemotec midi-fan 6-blader proved the way to go, with the holy grail achieved of more thrust with less current. Although it is claimed that it will work fine on 5s I suspect this may only be true if you keep the weight down, and herein lies the rub.
Because you really need to cover and paint it, plus alter significantly the undercarriage mountings and fit heavier metal gear etc, you will struggle to keep it around the claimed 5lbs. I guess if you can live with hand launching – omitting the gear altogether, and can also put up with the inevitable severe scratching and poor paintwork, and you don’t cover it – circa 5lb should be achievable and then 5S Li-Po and higher Kv motor would likely be ok.
This bench testing indicated a probable wattage of around 1000+ on a 6s Li-Po and with the efficient midifan this would mean a current draw of circa 45-50A. I selected a Turnigy Plush ESC of 60A rating, and also a Turnigy 5A UBEC to supply the radio and 6 servos – disconnecting the red power lead from the ESCs built in BEC unit.
Realising that my stock of suitable servos had dwindled un-noticed over recent months, a call to the excellent Sussex Model Centre had 5 HiTec HS65 servos winging there way to me 2 days later. I used a small Ripmax branded servo for the retract air valve, and a metal geared HS65 for the steerable nosewheel.
Ailerons are waggled with a servo in each wing panel, and pitch is via 2 x servos – one for each tailplane half.
THE FUSELAGE AND POWERTRAIN INSTALLATION
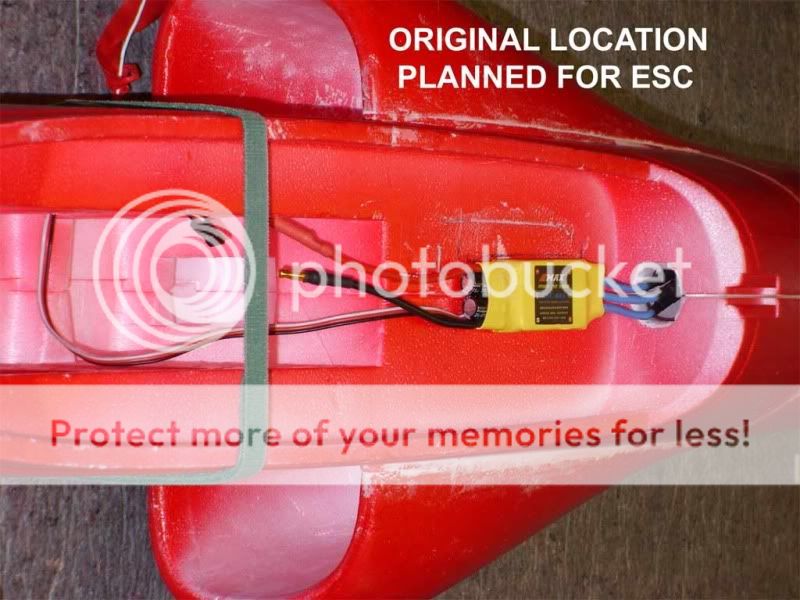
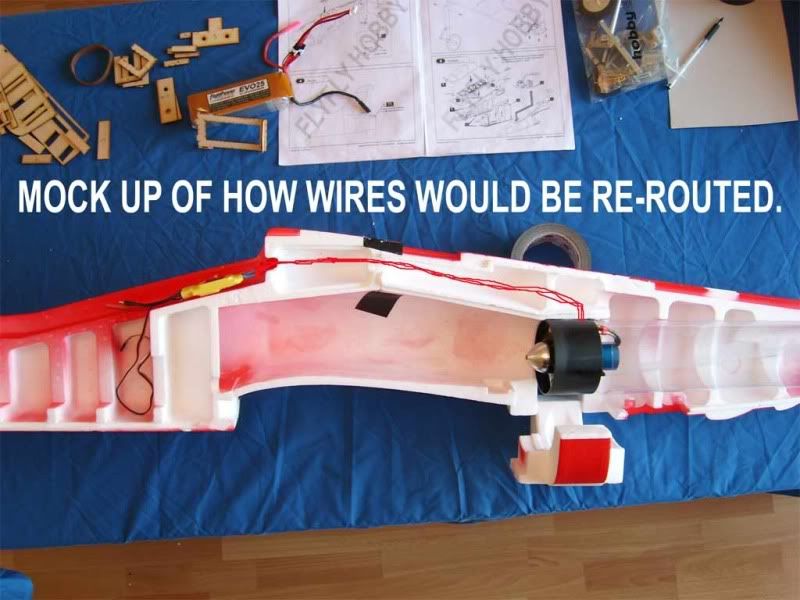
I decided to press on with the fuselage until it was pretty much complete, as this was where most of the modifications would be needed. I was concerned about the very long power leads required from battery to ESC position, so considered moving the ESC from its designated spot near the tail section above the fan, to up front in the cockpit area. However the original location was at least putting the unit right out into the airstream for good cooling.
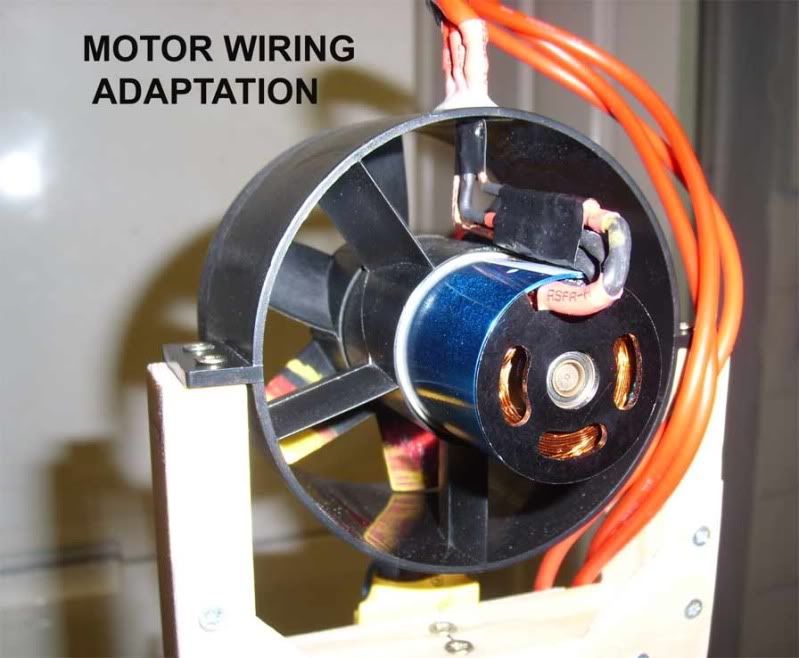
I didn’t like the method of fitting the motor and fan unit wiring and efflux tube either. As designed, this would mean that the acetate liner needed to be cut and the motor cabling fed through it and in to the fuselage cavity. Two things bothered me here. The 3 x heavy cables would be partially blocking the airflow out from the fan blades, and should the fan unit ever need to be removed at a later date, some butchering of the tube would be needed.

Furthermore, to remove the fan and motor. the efflux tube needs to be slid out of the tailcone a few inches – something which would prove tricky with cables routed through it. I therefore redesigned the motor cabling and made up 3 solid copper heavy gauge wires which were fitted through a slot I cut in the front part of the midifan housing – epoxied in place – and then ran back along the motor can and into the motor. The main flexible ESC cables were then soldered onto these copper wires. This cured both issues.
Battery location and fixing is also somewhat unorthodox, with the rather large and heavy 6s (4000 mAh or so) pack standing on its end under the cockpit floor, and supposedly retained by a flimsy hook and eye and rubber band system. It proved impossible to achieve this as the supplied ply plate was so badly warped as to be un-useable, and besides, it was simple never going to fit. I redesigned this area too, and made up my own system of fitting and retention.
One worry was of course whether the desired COG position could be achieved with my new system, and as the final fitting of the power-unit and tail feathers etc. had not yet been done, I would just have to hope that all would be well. The installation of the retract air tank and valve was also home made as most of the intended method relied on the useless warped ply plate mentioned earlier, so again, plywood and foam fixings were planned and installed in the forward area of the underfloor cockpit section. In the end, I fitted the ESC in its intended place, but may well re-consider this in the near future as the very long battery leads still do worry me.
UNDERCARRIAGE AND OTHER BITS
I had always insisted that I would get retracts fitted and working on this model – despite protestations and advice to the contrary from clubmates. Our grass strip is good, but not exactly a bowling green, thanks in part to electric fence resistant bullocks rampaging across our field occasionally! However, hand launching such a large model seemed inappropriate, and I never could be bothered messing about with dollies and bungees and the like.
The kit is supplied with scale oleo style undercarriage, with air retracts available as an option. I ordered the retracts at time of purchase, but after much deliberation and research on the WWW decided to ditch them via eBay, and went for some decent but somewhat pricey Springair 602s direct from the USA. I have larger versions of these air retracts in my IC Spitfire and can testify to their excellent construction and reliability.
Fitting the steerable, retractable, nosewheel proved one of the most challenging parts of the build. As designed, the unit was supposed to screw into two flimsy bits of liteply which in turn were glued to ¼ square foam ledges which were set into the fuselage sides. A similar and equally hopeless system was shown for the main gear fixings too. If this method was adopted, the chances of it all staying together during ROG or landing on a grass strip ( or indeed any strip in all probability ) was about as likely as a politician forgoing his allowance claims. Absolute rubbish.
Having read many threads on several other forums it was obvious that a complete redesign was needed. I also modified the actual wheel mounting fork on the oleo leg to take a larger diameter wheel than supplied, as I figured this bird was going to need all the help it could get to ROG on grass.
I then cut into the sidewalls of the foam nose area as far as I dare, and P/U glued some large ply plates, braced with dense foam support blocks for added rigidity.
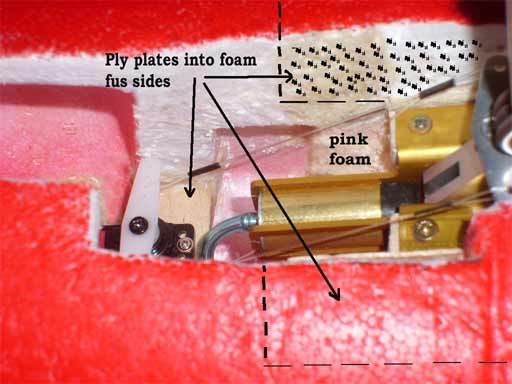
I also fitted the noseleg unit at an angle which would allow the extended leg and larger wheel to fully recess into the aperture upon retracting. Fitting a remote servo for steering also needed a lot of modification as the original units were designed to have the servo mounted to the retract unit itself. My system involves a metal geared HS51 servo and nylon covered steel fishing trace in a pull pull configuration, allowing the wires to go slack as the gear is retracted. I used the slightly modified fly-fly oleo legs and fitted them to the Springair retract units with good quality piano wire connecting rods – the ones supplied with the kit were soft and would bend just by scouring at them – a clubmate has the fly-fly Sabre and nicknamed these parts ‘Chinese Monkey Metal’ – about sums them up I think.
I wound a 3-turn coil into the noseleg connecting strut to provide even greater shock absorption. Quite a lot of surgery was required in this whole nosewheel operation, and in all, this work alone took me around 2 weeks working a few hours each day and evening to design and complete satisfactorily, with several problems encountered along the way. Thanks go to Matt Halton of this forum for his help on this task.
I had also opted for the (additional cost) noselight assembly, which was designed to plug into the balance plug of the flight battery, but I re-wired this so that it was activated immediately the battery was connected to the ESC. I fitted the C/F pitot tube and holder also at this stage.
Much fettling and fiddling with various aspects of construction then saw the fuselage just about done, and I decided to cover and paint it at this stage before fitting the tail feathers, for fear of damage to these sticky-out bits. I filled, sanded, and sealed the whole lot with one coat of Poly-C and did likewise with the tail feathers. I then cut out large panels of lightweight tissue to fit around the various curves and panel lines and applied this with more Poly-C, sanding off the high spots and inevitable creases. Two further coats of Poly-C and final sanding resulted in a reasonably lightweight but tough outer skin – much more resistant to hangar rash and scuffing. I then airbrushed the lot with water based Tamya acrylic X7 red paint. I went for the recommended method of fitting and controlling the all-moving tailplane, and despite its flimsy appearance it has worked perfectly well to date. I did however change the supplied pushrods and clevises etc. for better ones. Once the large vertical stabilizer was fitted and the twin elevator servos installed (very long leads required on these servos) the rear was complete, and I could put the assembled fuselage to one side.
THE WING
Compared to the rest of the build, the wing actually gave me little trouble. Again fairly major changes were made to the retract fittings, and the supplied depron wing fences (both broken in the packaging anyway) were replaced with slightly stronger versions. The two halves were joined with Gorilla Glue to take up any slight imperfections in the mating surfaces at the root, and I also elected to cut a channel in the foam spar and glued in (P/U again) a solid one-piece carbon fibre spar right across the span and through a hole I drilled into the centre section. This was also arranged in such a way as to provide more reinforcement to the home made retract plates, which I made up by laminating 3 separate ply plates – fixed to provide a far greater surface area. This can be seen in the pictures
Servos and linkages installed, I then removed the ailerons – they pretty much fell off unaided – and reaffixed them with diamond tape on both upper and lower surfaces. Retract plumbing was installed and an Ashlok multiway connector fitted for the radio connections. The wing was then prepared and covered ready for painting. Due to the large amount of panel lines and detail fittings on the wing, I chose to cut the tissue into matching pieces which would fit ‘jigsaw like’ onto the surfaces and leave the tiny extrusions and lines uncovered. The covering and painting was then done as per the fuselage.
FINISHING TOUCHES
Last job was to apply the few supplied decals, and fit the cockpit and canopy assembly – which is an impressive piece of nice clear plastic.A slightly oversize pilot was procured and dressed accordingly with red and white paint – the cockpit and canopy area is huge so would look pretty silly empty IMO.
SUMMARY
The kit is not an easy one to get on with due to the niggles I have outlined here, but as Cyril Carr has also stated it can be built up to a reasonably good standard with the addition of a few simple scale features. I suppose credit must go to Fly-Fly for producing this model at a pretty fair price and allowing us the chance to get airborne with a pretty fair representation of this classic British jet trainer. As the flying report indicated, she looks the part in the air, and definitely has the grin factor built in.
A rather poor kit in several ways, salvaged by the final result, but………..Only if you put in the effort where needed – final scores on the doors – 7/10
The day finally dawned to fit it all together and do a few ground runs and checks to ensure that all was working correctly. The weather did not play ball for a few weeks after completion, so the maiden flight was done on the first of June 2009, detailed in Pt 1 of this review ( a short video of the maiden flight was added on 5th June) see here
Article Tags:


